Images comprise a large part of your WordPress data which plays a key role in page speed.
Therefore, it’s extremely important to know how to use images correctly in order to boost your page speed.
In this post, I’ll share with you a couple of tips that help me manipulate images in the Media library.
Here’s a list of things you need know to take control of your images in WordPress.
Contents:
- Things You Need to Know about Your Images
- Using Images as Featured Image for Your Blog
- How to Resize/Compress an Original Image in Use EZGif.com
- Resizing Images in WordPress Media Library
- How to Display the Image File Size in WordPress
- How to Display the Image File Dimension in WordPress
- How to Resize Your Images Individually
- How to Bulk Resize Your Images in Media Library
- How to Crop Your Images in Media Library
- How to Display All Image Size in Media Library
Things You Need to Know about Your Images
Most people upload images to their WordPress library without actually compressing them. I’ve seen many users trying to upload image files over 1 to 8MB in size! Those files will typically have a gigantic dimension as well, e.g. 4000px by 1000px.
Trust me! You don’t really need such heavy image files on your website.
What should you really do before uploading?
You need to resize and compress your images as per your theme specifications.
Most modern themes come with a hero image which typically requires an image to be around 2000px by 500px in dimension.
The original images captured on your mobile phones and DSLR cameras tend to have much higher size and resolution that your website requires.
Therefore, you need to compress and resize them before uploading.
There are a couple of free image compression tools you can use to resize and compress your original images.
There are many more but I’ve personally used these two tools for a long time. These tools offer many other features as well. However, I use them for image resizing, cropping and compression purposes.
Using Images as Featured Image for Your Blog
Featured images typically appear at the top of a blog post. When you share a blog post on social media (Facebook/Twitter), your featured images appear prominently on your followers’ feed as well.
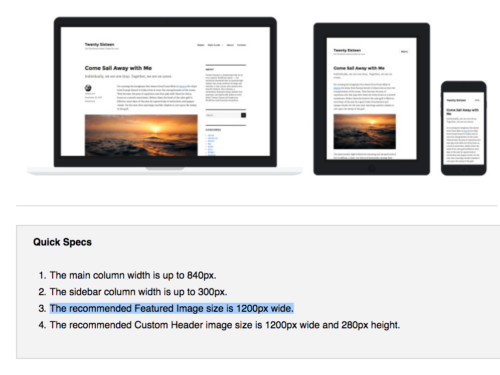
Almost all WordPress themes come with a predefined size for your featured image. For example, the theme for this blog has a featured image with a dimension of 1200px by 600px.
Similarly, in the Twenty Sixteen theme by WordPress, the recommended featured image size is 1200px wide.
Therefore, if you want to use an image as your featured image, you need to resize and compress the original image using either of the two tools recommend above.
How to Resize/Compress an Original Image in Use EZGif.com
If you’re uploading just one or two images at a time, then you can simply use this free tool: https://ezgif.com/resize
Step #1: Upload your image or enter the image URL (if you want to resize an existing image). Then click on the upload button.
Step #2: *You will see the following*
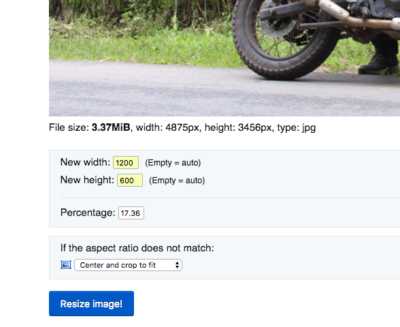
Enter the recommended width and height (e.g 1200 and 600 in my case) as per your featured image specs and click on the Resize Image button.
Wait a couple of seconds to see the resized image to appear below.
As you can see, the tool reduces the file size and crop the image from the center to maintain the current aspect ratio.
Additionally, you can optimize the image losslessly, meaning you strip off the metadata but retain the original quality. This makes the image even lighter.
To do this, you can click on the optimize button and click on the checkbox against lossless. Then click on the Optimize Image button.
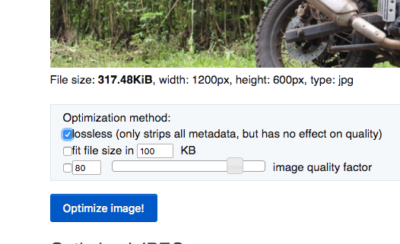
Now, you can right-click on the Resized and Optimized Image and save it to your desktop.
You now have a properly formatted and lightweight featured image ready for your blog posts.
Resizing Images in WordPress Media Library
If you want to resize and crop any existing image files in WordPress, you need to start with the media library.
To reach your media library, you need to go to media > library. The usual location is YourWebsiteURL.com/wp-admin/upload.php
You can see images either in grid view (default) or list view. When you click on a particular image, you can see the details of the image file such as file name, file type, dimension, file size and so on.

WordPress allows you to scale and crop images as per your needs.
However, inspecting file details and resizing them individually can be time-consuming.
By default, WordPress doesn’t show you any file information in the list view. Therefore, you need to use a few plugins or add a few code snippets to your functions.php file to display the file information in your list view.
How to Display the Image File Size in WordPress
Add the following code snippet to your functions.php file.
How to Display the Image File Dimension in WordPress
In order to show the file size, add the following code snippet to your functions.php file.
Go back to your media library, click on the list view and you should now see file size as well as file dimension information there.
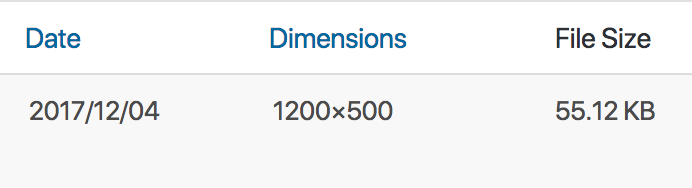
What’s more, you can actually sort the files based on their dimensions. This will help you prioritize your image resizing tasks.
Now, you’re ready to resize and compress your existing images in your media library.
How to Resize Your Images Individually
If you want to resize only a few selected images manually, you could do so by clicking on editing option.
In order to resize a particular image file, you need to view its original dimension first.
Here’s what you need to remember:
Option #1: Crop the original image if its dimension is just slightly higher than that of your featured image.
Option #2: If its dimension is more than two times, it’s better to resize the image first and bring it down before cropping it.
How to Bulk Resize Your Images in Media Library
If you want to bulk resize (not crop) your existing images in the media library, you can use this nifty plugin called Imsanity.
It’s free and pretty straightforward.
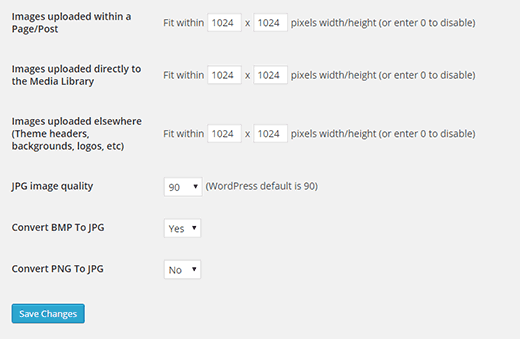
Simply, install, activate and enter the value in the dimension area, and you’re good to go.
Please, remember this plugin doesn’t crop your image — it simply resizes your images.
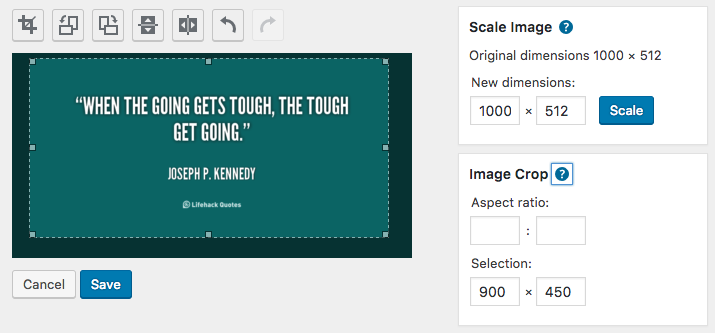
How to Crop Your Images in Media Library
To crop an image you need to click on the edit button first. Then, you need to click on the image itself to select the desired area for cropping.
After selecting the portion to crop, click on the crop button at the left upper corner of the tool, and then click on the SAVE button at the bottom.
As explained earlier, you can directly crop an original image to resize it as per your featured image specs. This also reduces the file size, resulting in a lightweight image file.
How to Display All Image Size in Media Library
When you upload an image to your WordPress site, WordPress auto-generates various versions of the same image as per your theme requirements.
However, WordPress doesn’t display information related those files by default.
Thankfully, by installing this plugin, you can view the information and permalinks of those files. The lightweight plugin can complement Regenerate Thumbnails plugin.
That’s it! I hope you will own the medial library like a boss moving forward.
If you hav any questions, let me know in the comments below. Don’t forget to share this post with your friends on social media.