Do you want to improve your WordPress site speed?
Well, that’s a silly question! Who wouldn’t want to boost their site speed and improve user experience!
However, the problem is it’s not really that easy to improve your score on Google PageSpeed Insights, especially if you’re looking to hit a 100/100.
To be honest, you should focus more on improving your user experience which is an ideal mix of site speed as well as great content.
Speaking of Page Speed, there are three different tools that are way more popular than others. They are:
Each of these tools measures your page speed differently. However, for the most part, they factor in similar factors while evaluating your page speed.
You should aim at getting a green mark (safe zone) in all of these tools rather than obsessive over the elusive perfect 100.
With that in mind, let’s delve a little deeper into the Page Speed Insights.
Optimize Images: Reduce Your Page Size by 80%
Many content creators upload full-size images regardless of the actual size displayed in their articles.
This affects the page speed to a great extent.
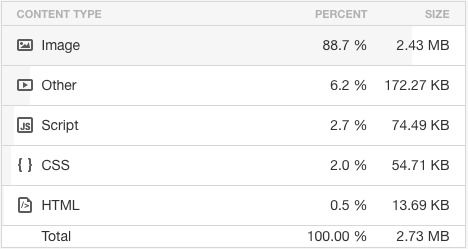
If you’re testing your site speed on Pingdom, you will see that images can take up a sizable portion of your page size. In the screenshot below, you can see the images account for more than 80% of the overall page size. I can certainly take care of the page speed simply by optimizing the existing images on my homepage.

In fact, most often, websites with a score of 80 (or more) on Google PageSpeed Insights will have a lighter page size (e.g less than 400kb). At least, that’s true for most of my blogs.
It’s a good practice to resize your current images with a tool before optimizing your website for page speed.
NOTE: When you test your website on Google PageSpeed Insights, it only factors in the images displayed on your homepage. For example, if the homepage of your website has 10 different images of which 5 are not optimized, Google will recommend compressing them. If your aim to focus only on improving page speed of your homepage, you might want to compress them manually with the use of this free image compression tool.
I use ezgif.com for compressing images before uploading them to my website. Apart from image compression, this free tool also helps you resize, crop and convert images in different formats.
Pro Tip: You can reduce the size of your images simply by converting the .png files into .jpg files with a tool like ezgif.com.
Popular Image Plugins for Image Optimization
There are many plugins that can help you with optimizing your current images. However, most of them are available with the usage limit.
EWWW Image Optimizer: I highly recommend this free image compression plugin that allows you to compress image size individually as well as in bulk. It also supports .png to .jpg conversion.
WP Smush: WP Smush is a popular plugin for image compression. However, in many cases, it won’t compress an image beyond 100kb. However, if you’re a premium member, it allows you to override this limitation and compress it further.
Tiny PNG: This plugin is one of the best when it comes to optimizing images on your WordPress site. For free users, it only compresses 500 images every month.
Optimum Image Optimizer: While this plugin doesn’t have any limitations with regards to the number of images, it doesn’t compress your images beyond 100kb. Also, it doesn’t support some specific image formats such as .gif.
NOTE: There are many other plugins for image compression. Be sure to preview their installation count and popularity before installing them.
I recommend uninstalling (and deleting) third-party plugins from your WordPress site after using them unless you plan to use them on a daily basis. There’s no point in keeping a third-party plugin idle if you’re not going to use it very regularly.
Eliminate Render-Blocking Javascript and CSS in Above-the-fold Content
In order to improve your page speed, you need to eliminate render-blocking javascript and CSS in above-the-fold content.

In plain English, this essentially means when someone visits your website on a mobile or desktop device, the priority content (e.g. text and images) in the above-the-fold area should load quickly.
Usually, most websites are built such that the javascript and CSS files load first before other content gets a chance to appear.
Needless to say, this negatively affects the user experience especially when your visitors view your website on a slow internet.
If you’re seeing this warning on Google Pagespeed Insights, you need must be using one or all of the following:
- Google Fonts
- Font Awesome
NOTE: Usually, many people enqueue scripts (e.g Google Fonts, Font Awesome) via functions.php file, which results in getting you a warning in Google Pagespeed Insights.
So, let’s see how to deal with these issues/warnings.
Remove Render-blocking Javascript:
In order to remove your render-blocking javascript, install, activate and configure the Autoptimize plugin.
Configure the plugin in the following ways:
- Under JavaScript Options uncheck “Force JavaScript in <head>?”
- Under CSS Options check “Inline all CSS?”
Don’t forget to click on the save changes button.
Remove Render-blocking CSS:
First of all, comment out or delete the code snippets for Google fonts, Font Awesome and Dashicon in your functions.php file.
Then try to install them in the following ways:
Google Fonts: To install Google Fonts asynchronously, add the following code to the footer section of your theme. To change font family, refer to Google Fonts.
Font Awesome: Enter the following code in the footer section of your theme.
Leverage Browser Caching
Google recommends setting an expiry date or a maximum age in the HTTP headers for static resources. This helps the browser make fewer round trips to server static content and results in faster page speed. If you want to learn more about this, visit Google’s guide on how to leverage browser caching.
Here’s how to do it:
The HTACCESS Method
Add the following rules to your .httaccess file.
The Plugin Method
If you’re not familiar with .htaccess, use any of the following plugins:
- WP Fastest Cache – WordPress plugin
- Browser Caching with .htaccess – WordPress plugin
- W3 Total Cache – WordPress plugin
While you can set an expiry date for files hosted on your server, you can’t really do it for any files hosted on an external server.
If you’re seeing any warning related to Google Analytics in Google Pagespeed Insights, you can’t set an expiry date for it via the .htaccess file.
Fortunately, there’s a nice workaround.
Instead of adding the analytics tracking code in your footer, use this analytics optimization plugin.
Simply install and activate the plugin, and enter the value (e.g your tracking ID) as shown in the screenshot below:

Don’t forget to choose footer as the position of your tracking code.
Minify HTML, CSS and Javascript
In order to make a page lightweight, you need to compress your HTML, CSS and Javascript files.
This can be easily done by Autoptimize plugin which we installed earlier. Simply, head over to the Settings > Autoptimize > Autoptimize Settings and make the following changes.
- Optimize HTML Code
- Optimize JavaScript Code
- Optimize CSS Code
Don’t forget to click on the save changes button.
Enable Gzip Compression
Gzip is a method of compressing files (making them smaller) for faster network transfers. It’s also a file format.
Some hosting companies enable this feature by default. For example, my web hosting company, Webfaction has already enabled this feature.
If your web hosting company hasn’t enabled Gzip compression by default, you can enable it by adding the following rules to your .htaccess file (on Apache server) or nginx.conf file (on Nginx server).
Add the following rules to your .htaccess file
Add the following rules to your nginx.conf file
Reduce Server Response Time
This is purely a hosting related issue. If you’re seeing this warning on PageSpeed Insights, this essentially means you need to upgrade to a better server. Also, implement CDN (Content Delivery Networks) service such as Amazon CloudFront CDN service. However, getting a server response time warning doesn’t mean you cannot get a higher score (above 85-90) in PageSpeed Insights.
That’s it!
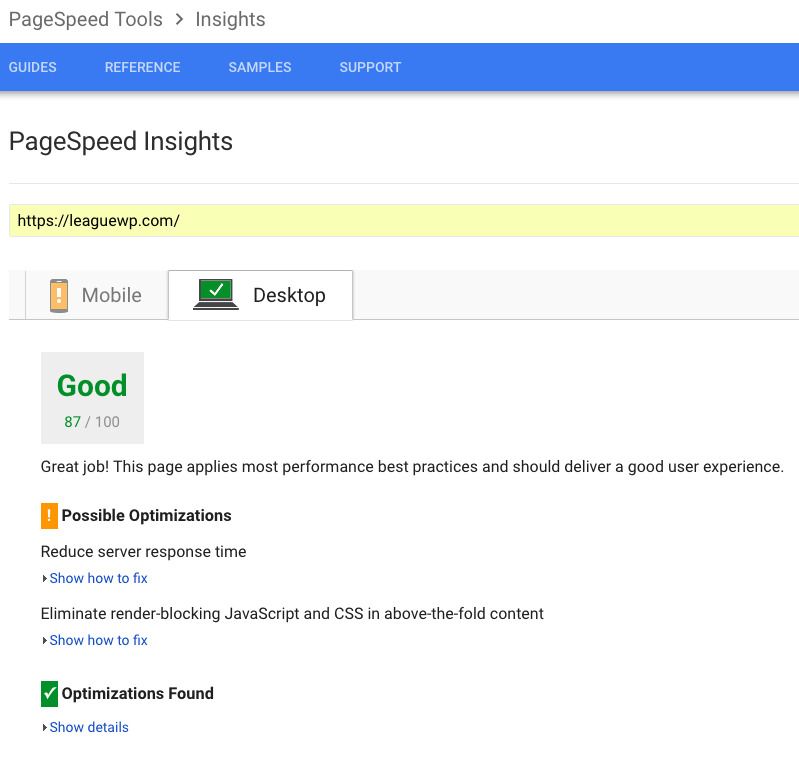
Go to PageSpeed Insights tool and run the page speed test for your website again. If you have followed the instructions correctly so far, your website should get a score above 85 in the tool.
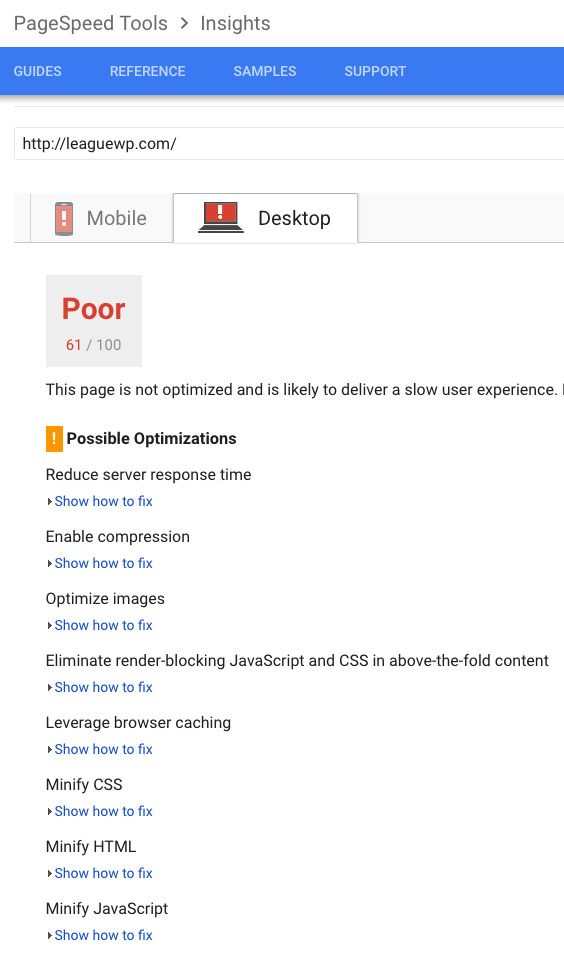
Here’s a realistic scenario:
Before Page Speed Insights Optimization

After Page Speed Insights Optimization

If you find this guide helpful, share it with your friends and coworkers.
