I’ve seen quite a few businesses using a standard gmail address to communicate with their customers. While it serves the basic purpose, it doesn’t really help their branding.
By using a basic Gmail address which doesn’t carry your domain name, you lose potential opportunities to advertise your brand.
Imagine offering your prospects and business partners your business cards which contain your website address but also a basic Gmail address. Looks a little odd, right?
Well, that’s exactly my point!
There are so many domain registrars that sell you domain names and hosting plans with free custom email addresses. But, what if you have bought just a plain domain name and still wants to create a free custom email address for your website?

Yes, you can pretty much do that, for free, thanks to free email hosting services offered by Zoho.
Zoho Mail is primarily meant to serve as a robust email hosting service for businesses / organizations to set up @<your-own-domain> type email addresses. However, individuals can create a free @zoho.com email address, which is as perfect for personal use. Select an option from below based on your email usage.
In this post, I will walk you through the entire process of setting up your free custom email address for your website.
So, let’s get started.
Step #1: Sign up with Zoho.in
Step #2: Go to inbox and click on the confirmation email. You can do it in 30 days but it’s better to do it now.
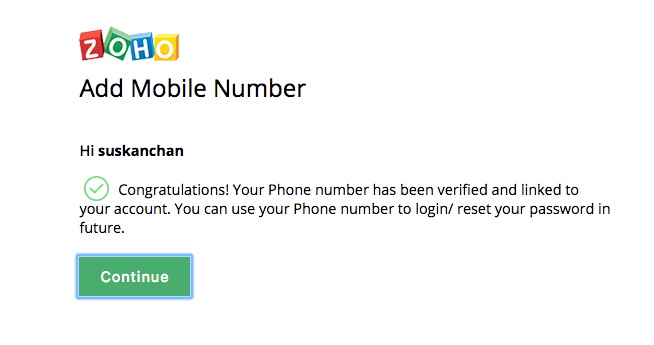
Step #3: Click on Mail and Enter Your Phone Number and Create a Password. This is for verification purposes.
Step #4: Check your OTP on your mobile phone and verify your phone number on the website.

Step #5: Add your existing domain for Email Hosting with Zoho and create domain-based address. OR Create email account as <username>@zoho.com
Step #6: Click on Add Domain Link in the First Option.
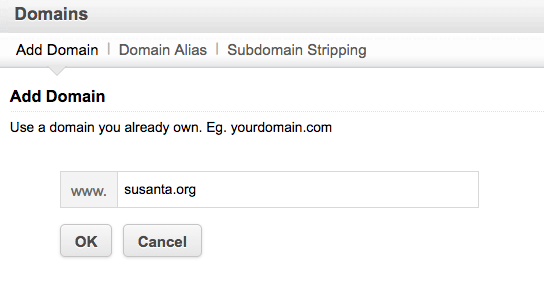
Step #7: Click on Add Domain, Enter Your Domain and Click ‘Ok’.

Step #8: After the Domain is added successfully, I will ask you to “Verify Your Domain“. Although you can do it later, but it’s best to do it now.
Step #9: Click on “Verify Your Domain“. It will take your to Domain Setup panel. You can see a drop-down menu under DNS Manager. Choose Your the one where you bought your domain. In my case, it was Name.com.
Step #10: Zoho Mail will give you some code for verification purpose. You will need to create a CNAME in your domain to prove your ownership.
Step #11: After you’ve created a CNAME record with the instructions given by Zoho Mail, click on the “Proceed to Click on Verification” button at the bottom of the page. You will see a pop-up asking you to “Verify Now“.
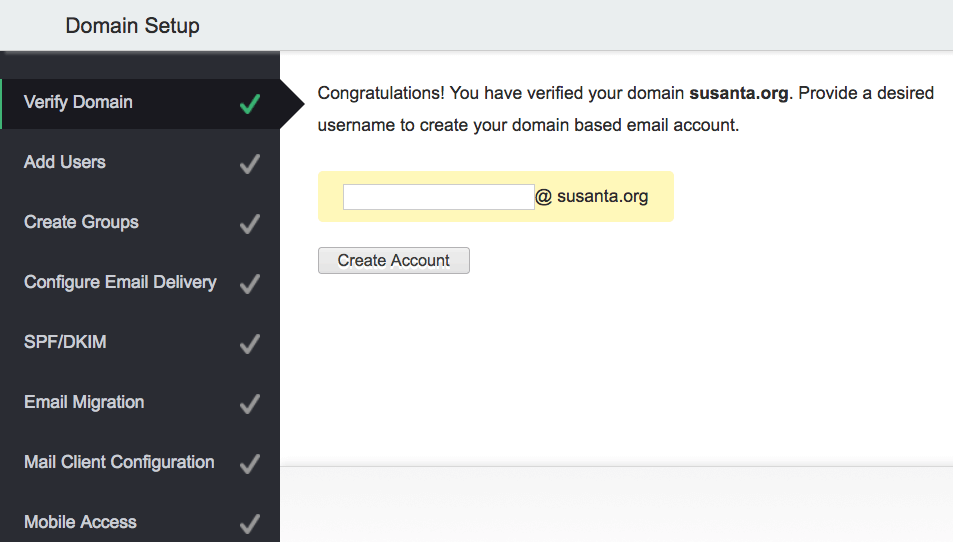
Step #12: Once you’ve verified your domain, you’ll see a congratulatory message. Now, you can create a username for your domain-based email address.

Step #13: If you want to create multiple email address for different users, you can do so by following the on-screen instructions. However, if you want to create just one email address at the moment, click on “Skip” to proceed to the next step.
Step #14: In the next step, Zoho Mail allows you to create Groups, meaning a common email address such as hr@yourdomain.com. If you don’t want this, you can click on “Skip” to proceed to the next step.
Step #15: At this point, your email address is created but what about the email delivery? You need to configure your email delivery to start receiving emails, yes?
For this purpose, you need to configure the MX Records (Mail eXchange Records) under DNS Manager. Sounds complex?
Don’t worry, Zoho Mail got proper instructions to walk you through the process.
Essentially, you need to configure your DNS with the MX Records of Zoho.
Simply, choose your domain provider from the drop-down menu and Zoho will walk you through.
After adding the MX Records in your DNS, click on “Next” to proceed to the next step.
Special Note: Zoho advises adding SPF (Sender Policy Framework) and DKIM Signature to secure your email address against Email Spoofing. Either you can do it now or skip it for later. Again, Zoho will walk you through the process. So, there’s nothing to worry about.
Step #16: At this point, you email is fully setup. You should be able to send and receive emails using Zoho Mail.
However, if you want to use Zoho Mail using a third-party email client such as Gmail app, you need to configure the settings in the email client using the POP/IMAP.
How to Configure Your New Email Address in Gmail App
Step #1: Before you set up your new email address in your Gmail app, you need to enable IMAP on your Zoho Mail.
Open your Zoho Mail inbox (mail.zoho.com) in another tab. It will load the inbox for you. Click on the Cog Icon at the upper right corner. It will open the mail settings for you.
Step #2: Scroll down and Click on “Email forwarding and POP/IMAP” under “Access Old Version For“. It will open up in another tab.
Step #3: Go to the IMAP Access and Choose “Enable“. Also, you will find the IMAP configuration details there. You will use these details while configuring your email address in your Gmail App.
Step #4: Go to your Gmail App on your Android Device and Click on “Add account” option. It will take you to “Set up email” page. Click on “Other” option, enter your email address and click “Next”.
Step #5: Enter your email address again and click on “Manual Setup” option. Choose “Personal (IMAP)” under type of account, and click next. Fill out the password (Zoho Password) for your email address, and then click next. In the next page, you will need to fill out the Incoming Server name which is imappro.zoho.com. You will also need to enter the Port: 993 and SSL when in the subsequent step. Likewise, set up the Outgoing Server.
Step #6: Once this is done, send a test email to another email address to see if it’s working. If you’ve followed steps correctly, it should.
With this the Mail Client Configuration is over.
I hope you find this guide useful and create your custom email address easily.
Share this post with your friends on social media or share your thoughts in the comments below.
