If you have a self-hosted WordPress website, and you want to 301 redirect your old domain to your new domain (or any existing domain), you will need to follow the steps below.
The task can be divided into four major subtasks such as:
Task #1: Exporting (downloading) content of your old site (.xml format)
Task #2: Importing (uploading) .xml file to your new site
Task #3: Modifying your .htaccess file for 301 redirection
Task #4: Updating your property on Google Console (Webmaster Tools)
Exporting and Importing .XML Files in WordPress
Both Task #1 and #2 are very easy if you’re familiar with WordPress. However, I’ll quickly walk you through the process to make sure you get a complete view.
Step #1: Login to your old site’s Dashboard and click on Export under Tools.
Step #2: Click on “Download Export File” if you want to transfer all content pieces as shown in the screenshot below.
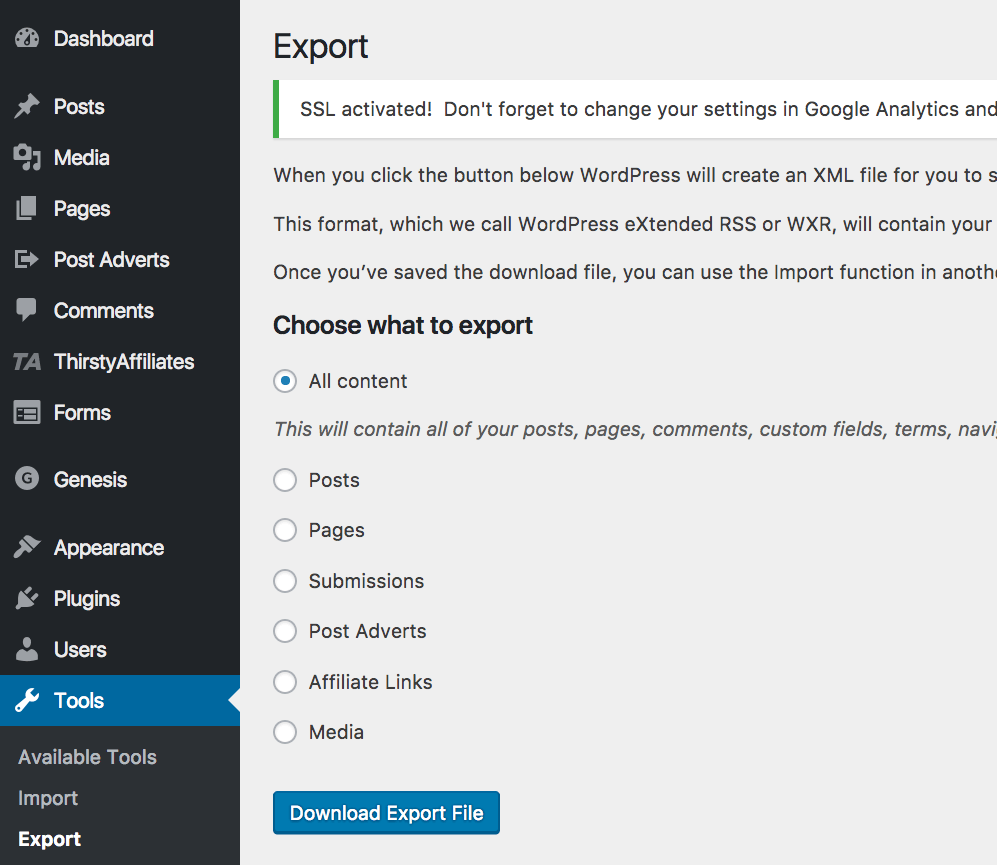
Otherwise, choose the kind of content you want to export and click on the download button. For example, if you want to export only blog posts and the featured images attached to them, then you will need to choose “posts” and “media” separately and download two files. Please, keep in mind, WordPress doesn’t allow you to choose multiple options in one go.
Step #3: Login to your new site’s Dashboard and click on Import under Tools.
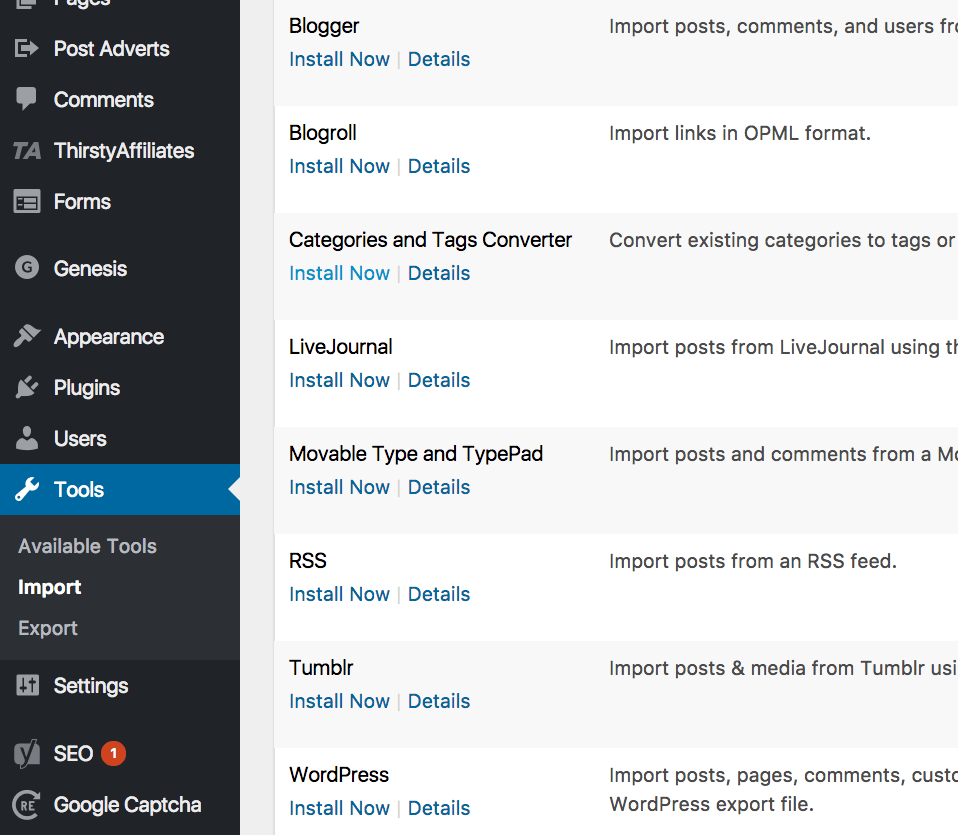
Step #4: There, you can see various options to import your XML file(s) you downloaded in Step #2. Click on “Install Now” under WordPress, and then click on Run Importer.
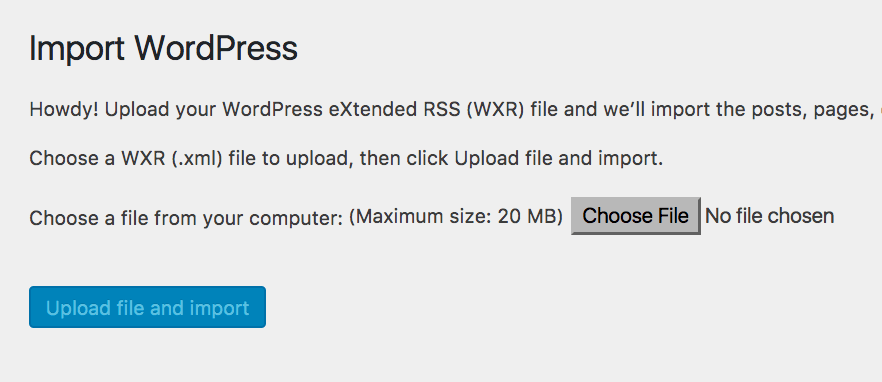
Step #5: Once you run importer, you will see the following page (see screenshot below). Simply click on the “Choose File” button, and upload the .xml file(s) from your computer. It might ask you to assign your posts from your old site to the new site’s author. Choose any names from the drop-down menu and click on Import.
Depending on the size of your files, WordPress will process your request and display a status alert. For example, if you have around 50 posts, it should take about a minute.
At this point, you’re done with transferring content from your old domain to your new domain. It’s time for the 301 redirection.
Modifying your .htaccess File for 301 Redirection
There are some plugins that can help you do this if you’re not very savvy with using the FTP. If you have the working knowledge of FTP, you can do this with the following steps:
Step #1: Open Your FTP Client: I use Filezilla
Step #2: Go to Your Root Folder and Locate the .htaccess File.
Step #3: Download it to take a backup of the file first. If something goes wrong, you can always upload the original .htaccess file and restore your site.
Step #4: Edit Your .htaccess File: Replace the existing code with the following code:
#Use PHP 5.4
 # Use PHP54 as default
 AddHandler application/x-httpd-php54 .php
 suPHP_ConfigPath /opt/php54/lib
 RewriteEngine on
 RewriteCond %{HTTP_HOST} ^myoldwebsite.com [NC,OR]
 RewriteCond %{HTTP_HOST} ^www.myoldwebsite.com [NC]
 RewriteRule ^(.*)$ http://mynewdomain.com/$1 [L,R=301,NC]
 # BEGIN WPSuperCache
 # END WPSuperCache
 # BEGIN WordPress
 RewriteEngine On
 RewriteBase /
 RewriteRule ^index\.php$ - [L]
 RewriteCond %{REQUEST_FILENAME} !-f
 RewriteCond %{REQUEST_FILENAME} !-d
 RewriteRule . /index.php [L]
# END WordPress
Important: Make sure you replace myoldwebsite.com with your old domain name in both instances. Likewise, replace http://mynewdomain.com with your new domain.
Please, note that in both instances of RewriteCond, you need not add http or https to your old domain URL. However, in RewriteRule, you need to add the http or https to your new domain.
Warning: If you’re not sure about the above instruction, don’t act in a hurry. It might lead to errors and your site might even break until you restore the old .htaccess file or fix the errors. Ask me about this in the comments at the end of the post.
If you have followed me along, simply save your updated .htaccess file.
Now, check both sites (old as well and new) to see if the redirection is working properly.
Redirect The Entire Old Domain
What If you want to redirect the entire of the old domain (and not just blog posts) to your new domain address?
Instead of the previous code, paste the following code in your old site’s .htaccess file.
RewriteEngine On
 RewriteRule ^(.*)$ https://mynewdomain.com/$1 [R,L]
 # BEGIN WordPress
 RewriteEngine On
 RewriteBase /
 RewriteRule ^index\.php$ - [L]
 RewriteCond %{REQUEST_FILENAME} !-f
 RewriteCond %{REQUEST_FILENAME} !-d
 RewriteRule . /index.php [L]
 # END WordPress
Once you have saved your work and checked that everything is working well, head over to Google Console (Webmaster Tools) and tell Google Search Engine about the transfer.
Updating your Property on Google Console
Even as you have completed the 301 Redirection, you still need to update your property on Google Console to make sure Google start indexing the content in the new domain address.
Simply, head over to Google Console and choose the property associated with your old website domain name. Once on Dashboard, look to the right-hand side, locate the cog icon and click on it. You will see the drop-down menu (as shown in the screenshot below).
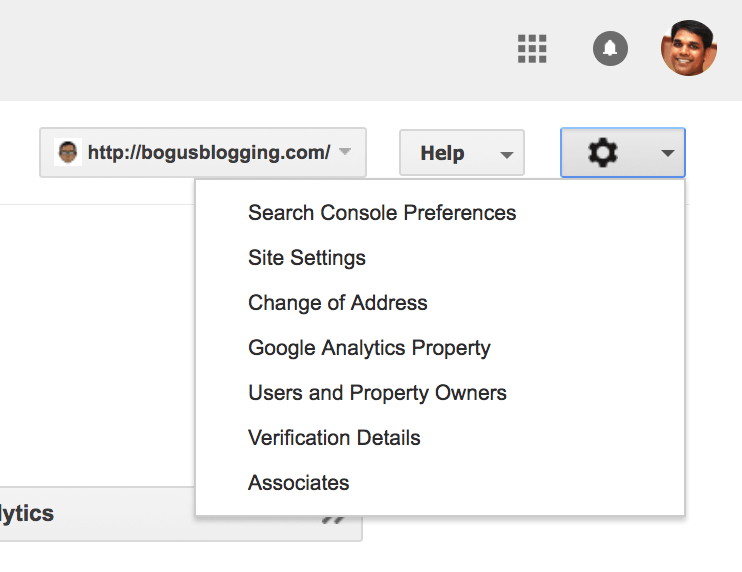
Click on Change of Address in the menu, and you will see the following screen.
At this point, Google may already have tracked the 301 redirection and ticked the first two boxes for you (see screenshot below). You just need to click on the Confirm Option, and then on Submit Option.
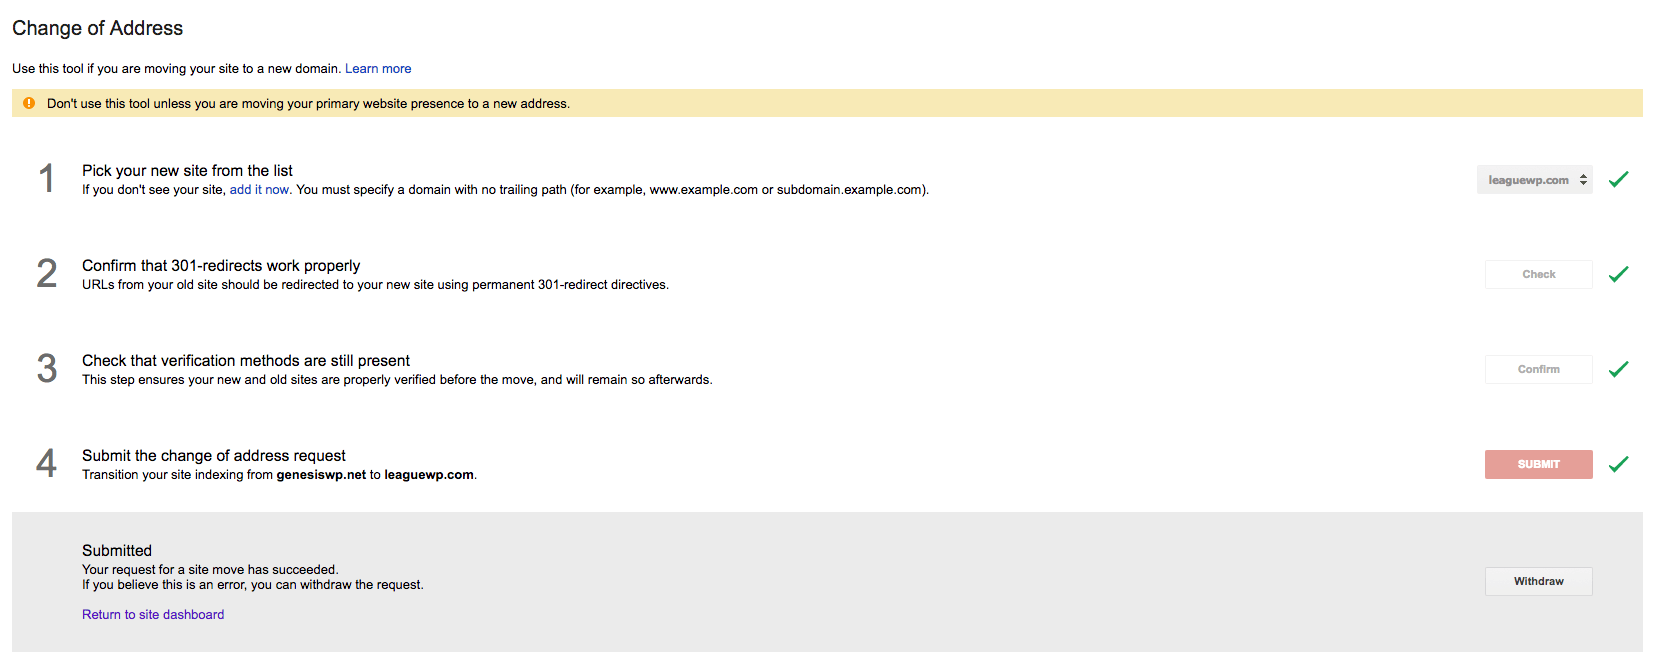
Google Console will confirm your request and show you a box stating “Submitted”. It also allows you to withdraw your request at any time in the future.
Go to Google Search, and type site:myolddomain.com
You will see a list of URLs from your old domain that Google has indexed so far. In a few weeks after your submission for the Change of Address request, you should see those links disappear.
Hope you found this post useful. If you do, don’t forget to share it with your friends. Don’t’ hesitate to leave a comment, question, feedback if you believe otherwise.
